What is the benefit in using the Clone method to issue a certificate?
If you have an Insured that repeatedly submits identical certificates requests, with perhaps only one small difference between requests, (for instance, the project number in the Description of Operations, or the Holder Name), certificate cloning might be the best processing method for you.
Because a cloned certificate is an exact replica of a historically issued certificate that was previously approved by all parties (Holder, Insured, Etc.), you'll know the cloned certificate will already meet the requirements by the same parties.
Certificate cloning lets you issue a certificate with the utmost efficiency, saving you valuable time because you were able to make use of work you did before.
To download a step-by-step walkthrough, click HERE.
OR
See below for a full video walkthrough:
This guide will review selecting the most common ACORD form, the ACORD 25.
To begin, drop down “Certificates” and click “Manager”.

Within your certificate manage, find a certificate you want to clone.
You can utilize the “Filters” option to conveniently search through your certificates.
Once you found the certificate you want to clone, click the “Actions” menu on the far right.

Within the Actions menu, click “Clone”.

Certificate Hero will clone the selected certificate and notify you in the upper right corner when the clone is successful.

You will then be brought to the Certificate Editor.

For an overview of the Certificate Editor, click HERE.
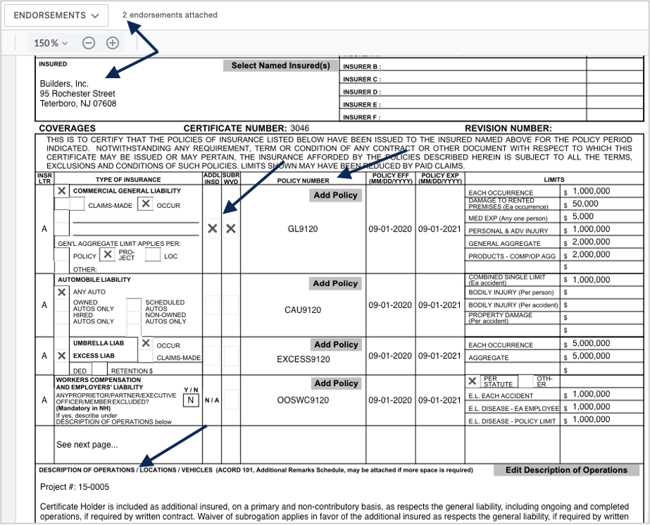
The cloning method will make an exact copy of the certificate you selected to clone. This will include everything from the attached endorsements and Named Insured to the policies, any checked AI or WOS boxes, and specific verbiage in the Description of Operations (DOO).
At this stage, all you need to do is review the certificate and make any changes that are required for this certificate.
After making the necessary changes to this cloned certificate, if you are ready to complete and issue the certificate, proceed to the Certificate Review.
For the purpose of this walkthrough, let's imagine the only difference for the new certificate was a new project number, and all else stayed the same.
Enter the DOO to make the revision.

Within the DOO editor, you will see the project number from the original certificate you cloned. Update to the new project number.

After updating to the new project number, click “Update Certificate”.

The DOO will be updated with the new project number.

Certificate Review
Once you have made all necessary changes per the new certificate request, click “Review" to preview and review the certificate prior to issuance.

This will bring you to the Certificate Review where you can preview the certificate and attached endorsements prior to issuing your certificate prior to issuance.

Within the distribution section to the right, you can input any distribution required for the certificate.
When you are ready to issue the certificate, select one of the issuance options in the lower right.

For a review of how to complete and issue certificates, click HERE.
Back within the Certificate Manager, you will see your issued certificate with the new revisions included.
