Download an Import Template
To ensure you Import report is filled out correctly, you can download an import template prior to uploading your document. Certificate Hero supports both CSV and Excel. You can find both templates within the "Create Import" slide out menu, or by clicking below.
Download CH CSV template HERE.
Download CH Excel template HERE.
Note: The Import feature is best suited for adding new holders and generating new certificates.
If you need to update existing certificates, please use the Import & Update option and follow the steps outlined below.
Keep in mind:
Before updating, you'll first need to export your current certificate list, make changes only to the fields that can be updated (see list below), and then re-import that updated file.
For step-by-step instructions on how to export your certificates, click HERE
Certificate Import
From the Certificates menu, click "Import".

On the next screen, in the upper right corner, click the orange "Create Import" button.

On the next screen, enter the name for the import. You can optionally add a description for your Import as well.
In the delimiter dropdown, you will select "comma". This will separate the different pieces of data, where applicable (i.e., to separate between multiple endorsements).
Upload your document by dragging and dropping into the field, or by clicking to search your device.

Once all required fields are filled out, click the blue "Import Certificates" button.

After your import is complete, you will be brought back to your Certificates Import menu. The status will read "completed" and you can confirm the number of certificates imported within the "# of Certs" column.

If you would like to download a zip file containing PDF copies of the imported certificates, within the "Actions" menu on the far right of the import, click "Download".

Your new certificates will now be found within your Certificate Manager with a status of "Issued".

* Please Note: Any verbiage entered in the Description of Operations column of the import report will override the verbiage entered in the Description of Operations of the COI Template entered on the report. This includes leaving this field blank. If you need the verbiage from the COI Template to be referenced on the certificate, you can copy and paste the text from the COI Template into the Description of Operations field on the Import Report.
Import and Update Existing Certificates
Need to make updates across existing certificates for an insured, but not adding a new one?
Our Import & Update feature makes it easy.
Whether you're working with an updated holder list at renewal or need to deactivate certificates in bulk—without manually digging through the Certificate Manager grid—you can streamline the process by using this tool.
Simply export your certificate data using the Export manager, make updates to the appropriate columns (see list below), and re-import the file to apply changes across all relevant certificates within your insured’s account.
Editable Columns:
-
Deactivated Date
-
Description of Operations
-
Holder
-
Holder Name
-
Holder Address
-
Mailing Address Line 1
-
Mailing Address Line 2
-
Mailing Address Line 3
-
City
-
State
-
Country
-
Postal Code
Please Note:
Changes to any other columns will be ignored.
All dates must use the format:
"1/21/2021"Column names in the CSV must remain unchanged.
Only Active certificates will be updated.
To perform an Import and Update:
From the Certificates menu, click "Import".

In the upper right corner, click the orange "Create Import" button.
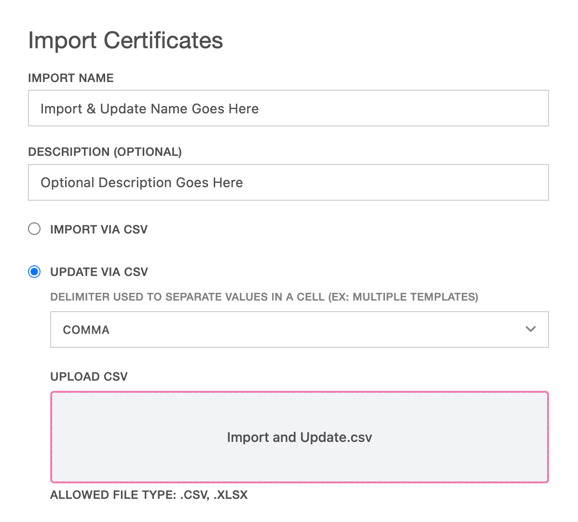
On the next screen, enter the name for the import. You can optionally add a description for your Import as well.
In the delimiter dropdown, select "comma". . This will separate the different pieces of data, where applicable.
Click the option that says "Update via CSV".
Upload your updated spreadsheet by dragging and dropping into the field, or by clicking to search your device.
Click "Import" to close the modal and begin the update process.

A pop-up modal will appear reminding you of the fields eligible for update (listed above).

Click "Import and Update" to close the modal and begin the update process.
Once the update is complete, you’ll return to the Certificates Import menu. The status will read "Completed", and you can review the number of updated certificates in the "# of Certs" column.
As with regular imports, you can download a ZIP of PDFs via the "Actions" menu.
All updated certificates will appear in the Certificate Manager with a status of "Issued".